[iOS] Setting Up a Core Data Stack / 코어데이터 스택 세팅하기
Setting Up a Core Data Stack
https://developer.apple.com/documentation/coredata/setting_up_a_core_data_stack
앱의 객체를 관리하고 유지하는 클래스를 설정
Overview
Creating a Core Data Model에 따라 데이터 모델 파일을 생성한 후 앱의 모델 계층을 공동으로 지원하는 클래스를 설정합니다.
이러한 클래스를 총칭하여 Core Data stack이라고 합니다.
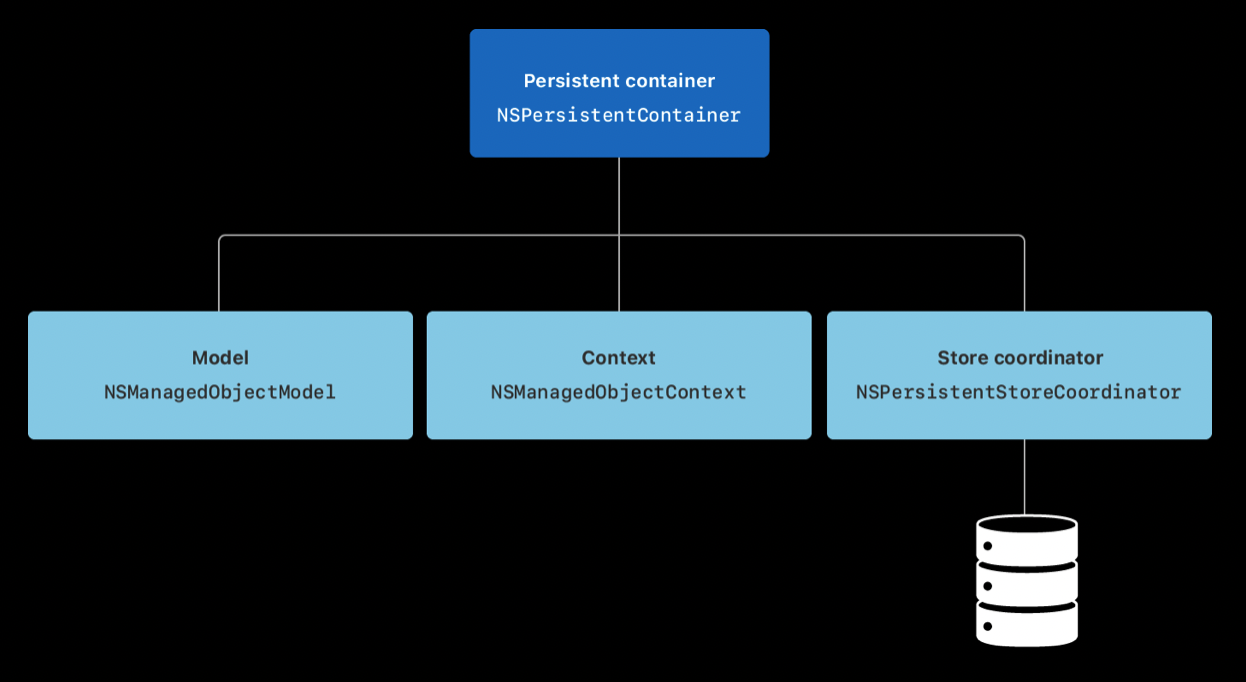
- NSManagedObjectModel의 인스턴스는 앱의 유형, 속성 및 관계를 설명하는 앱의 모델 파일을 나타냅니다.
- NSManagedObjectContext 인스턴스는 앱 유형의 인스턴스에 대한 변경 사항을 추적합니다.
- NSPersistStoreCoordinator 인스턴스는 스토어에서 앱 유형의 인스턴스를 저장하고 가져옵니다.
- NSPersistentContainer의 인스턴스는 모델, 컨텍스트 및 저장소 코디네이터를 한 번에 설정합니다.
Initialize a Persistent Container
일반적으로 앱을 시작할 때 Core Data를 초기화합니다.
영구 컨테이너를 lazy 변수로 만들어 인스턴스화를 앱 위임자에게 처음 사용할 때까지 연기합니다.
새 Xcode 프로젝트를 생성할 때 Core Data 확인란을 선택한 경우 템플릿은 자동으로 이 설정 코드를 AppDelegate에 포함합니다.
- NSPersistentContainer 유형의 lazy 변수를 선언합니다.
- 데이터 모델 파일 이름을 이니셜라이저에 전달하여 영구 컨테이너 인스턴스를 만듭니다.
- 영구 저장소를 로드합니다. 이 호출은 저장소가 없는 경우 저장소를 만듭니다.
class AppDelegate: UIResponder, UIApplicationDelegate {

    ...

    lazy var persistentContainer: NSPersistentContainer = {
        let container = NSPersistentContainer(name: "DataModel")
        container.loadPersistentStores { description, error in
            if let error = error {
                fatalError("Unable to load persistent stores: \\(error)")
            }
        }
        return container
    }()

    ...
}
일단 생성되면 영구 컨테이너는 모델, 컨텍스트 및 스토어 코디네이터 인스턴스에 대한 참조를 각각 managedObjectModel, viewContext 및 persistentStoreCoordinator 프로퍼티에 저장합니다.
이제 컨테이너에 대한 참조를 사용자 인터페이스에 전달할 수 있습니다.
Pass a Persistent Container Reference to a View Controller
앱의 루트 뷰 컨트롤러에서 Core Data를 import하고 영구 컨테이너에 대한 참조를 보유할 변수를 만듭니다.
import UIKit
import CoreData

class ViewController: UIViewController {

    var container: NSPersistentContainer!

    override func viewDidLoad() {
        super.viewDidLoad()
        guard container != nil else {
            fatalError("This view needs a persistent container.")
        }
        // The persistent container is available.
    }
}
AppDelegate로 돌아갑니다.
application(_:didFinishLaunchingWithOptions:)에서 앱 window의 rootViewController를 앱의 루트 뷰 컨트롤러 유형으로 다운캐스팅합니다.
이 참조에서 루트 뷰 컨트롤러의 컨테이너 프로퍼티를 영구 컨테이너로 설정합니다.
class AppDelegate: UIResponder, UIApplicationDelegate {

    ...

    func application(_ application: UIApplication, didFinishLaunchingWithOptions launchOptions: [UIApplication.LaunchOptionsKey: Any]?) -> Bool {
        if let rootVC = window?.rootViewController as? ViewController {
            rootVC.container = persistentContainer
        }
        return true
    }

    ...
}
영구 컨테이너를 추가 뷰 컨트롤러에 전달하려면 각 뷰 컨트롤러에서 컨테이너 변수 작성을 반복하고 이전 뷰 컨트롤러의 prepare(for:sender:)에서 해당 값을 설정합니다.
class ViewController: UIViewController {

    ...

    override func prepare(for segue: UIStoryboardSegue, sender: Any?) {
        if let nextVC = segue.destination as? NextViewController {
            nextVC.container = container
        }
    }
}
Subclass the Persistent Container
NSPersistentContainer를 상속합니다. 하위 클래스는 데이터의 하위 집합을 반환하고 데이터를 디스크에 유지하기 위해 호출하는 함수같은 Core Data 관련 코드를 넣기에 편리한 장소입니다.
import CoreData

class PersistentContainer: NSPersistentContainer {

    func saveContext(backgroundContext: NSManagedObjectContext? = nil) {
        let context = backgroundContext ?? viewContext
        guard context.hasChanges else { return }
        do {
            try context.save()
        } catch let error as NSError {
            print("Error: \\(error), \\(error.userInfo)")
        }
    }
}
위의 예에서는 컨테이너에 saveContext 함수를 추가하여 변경사항이 있을 때만 컨텍스트를 저장하여 성능을 향상시킵니다.
Note
모델 계층을 자체 프레임워크로 팩터링할 때 NSPersistentContainer 하위 클래스는 모델 파일을 자체 번들에 위치합니다.