
티스토리 뷰
전면 및 후면 iPhone 및 iPad 카메라를 사용하여 depth 데이터와 사진을 캡처하고, 동영상을 녹화합니다.
Overview
iOS 카메라 앱을 사용하면 전면과 후면 카메라 모두에서 사진과 영상을 캡처할 수 있습니다.
장치에 따라 카메라 앱은 깊이 데이터(트루뎁스), 무광 세로 효과 및 실시간 사진 스틸 캡처도 지원합니다.
이 샘플 코드 프로젝트인 AVCam은 이러한 캡처 기능을 자신의 카메라 앱에서 구현하는 방법을 보여줍니다.
아이폰과 아이패드 카메라가 내장된 기본 기능을 사용합니다.
참고
AVCam을 사용하려면 iOS 13 이상을 실행하는 iOS 기기가 필요합니다. Xcode는 장치 카메라에 접근할 수 없기 때문에 이 샘플은 Simulator에서 작동하지 않을 것입니다. AVCam은 iPhone 7 Plus의 초상화 효과 등 현재 장치가 지원하지 않는 모드의 버튼을 숨깁니다.
Configure a Capture Session
AVCaptureSession은 카메라 및 마이크와 같은 캡처 장치에서 입력 데이터를 허용합니다.
입력을 수신한 후 AVCaptureSession은 해당 데이터를 적절한 출력물로 처리하여 동영상 파일이나 스틸 사진을 생성합니다.
캡처 세션의 입력 및 출력을 구성한 후 캡처를 시작하고 나중에 중지하도록 지시합니다.
private let session = AVCaptureSession()AVCam은 기본적으로 후면 카메라를 선택하고 콘텐츠를 비디오 미리 보기 보기로 스트리밍하도록 카메라 캡처 세션을 구성합니다.
PreviewView는 AVCaptureVideoPreviewLayer에서 지원하는 사용자 지정 UIView 하위 클래스입니다.
AVFoundation에는 Preview 클래스가 없지만 샘플 코드는 세션 관리를 용이하게 하기 위해 클래스를 만듭니다.
다음 다이어그램은 세션이 입력 장치 및 캡처 출력을 관리하는 방법을 보여 줍니다.

입력 및 출력을 포함하여 AVCaptureSession과의 모든 상호 작용을 전용 직렬 디스패치 대기열(sessionQue)에 위임하여 상호 작용이 기본 대기열을 차단하지 않도록 합니다.
세션 구성은 대기열이 변경사항을 처리할 때까지 항상 다른 작업의 실행을 차단하므로 세션의 토폴로지 변경이나 실행 중인 비디오 스트림 중단과 관련된 모든 구성을 별도의 디스패치 큐에서 수행합니다.
마찬가지로 샘플 코드는 중단된 세션 재개, 캡처 모드 전환, 카메라 전환, 미디어 파일 쓰기 등의 다른 작업을 세션 큐에 디스패치하여 처리 시 앱과의 사용자 상호 작용을 차단하거나 지연시키지 않도록 합니다.
코드는 CALayer의 하위 클래스인 AVCaptureVideoPreviewLayer가 샘플의 미리보기 보기를 위한 백업 레이어이기 때문에 UI에 영향을 미치는 작업(예: 미리보기 보기 업데이트)을 메인 큐로 디스패치합니다.
메인 스레드에서 UIView 하위 클래스가 적시에 대화형 방식으로 표시되도록 조작해야 합니다.
ViewDidLoad에서 AVCam은 세션을 작성하고 미리 보기 보기에 할당합니다.
previewView.session = session더 자세한 정보 Setting Up a Capture Session
Request Authorization for Access to Input Devices
세션을 구성하면 입력을 받아들일 준비가 됩니다.
각 AVCaptureDevice(카메라든 마이크든)는 사용자가 액세스 권한을 부여해야 합니다.
AVFoundation은 사용자가 캡처 디바이스에 대한 액세스를 제한했는지 또는 거부했는지 알려주는 AVAuthorizationStatus를 사용하여 권한 부여 상태를 열거합니다.
사용자 지정 권한 부여 요청을 위해 앱의 Info.plist를 준비하는 방법에 대한 자세한 내용은Requesting Authorization for Media Capture on iOS을 참조하십시오.
Switch Between the Rear- and Front-Facing Cameras
ChangeCamera 방식은 사용자가 UI에서 버튼을 누르면 카메라 간 전환을 처리합니다.
사용 가능한 디바이스 유형을 기본 설정 순서대로 나열하고 디바이스 배열에서 첫 번째 디바이스를 수락하는 검색 세션을 사용합니다.
예를 들어 AVCam의 videoDeviceDiscoverySession은 앱이 실행 중인 장치에 사용 가능한 입력 장치를 쿼리합니다.
또한 사용자의 기기에 카메라가 고장 나면 기기 배열에서 사용할 수 없습니다.
switch currentPosition {
case .unspecified, .front:
    newVideoDevice = backVideoDeviceDiscoverySession.devices.first

case .back:
    newVideoDevice = frontVideoDeviceDiscoverySession.devices.first

@unknown default:
    print("Unknown capture position. Defaulting to back, dual-camera.")
    newVideoDevice = AVCaptureDevice.default(.builtInDualCamera, for: .video, position: .back)
}
검색 세션에서 올바른 위치에 있는 카메라를 찾으면 캡처 세션에서 이전 입력을 제거하고 새 카메라를 입력으로 추가합니다.
// Remove the existing device input first, because AVCaptureSession doesn't support
// simultaneous use of the rear and front cameras.
self.session.removeInput(self.videoDeviceInput)

if self.session.canAddInput(videoDeviceInput) {
    NotificationCenter.default.removeObserver(self, name: .AVCaptureDeviceSubjectAreaDidChange, object: currentVideoDevice)
    NotificationCenter.default.addObserver(self, selector: #selector(self.subjectAreaDidChange), name: .AVCaptureDeviceSubjectAreaDidChange, object: videoDeviceInput.device)

    self.session.addInput(videoDeviceInput)
    self.videoDeviceInput = videoDeviceInput
} else {
    self.session.addInput(self.videoDeviceInput)
}
Handle Interruptions and Errors
캡처 세션 중에 전화 통화, 다른 앱의 알림 및 음악 재생과 같은 중단이 발생할 수 있습니다.
AVCaptureSessionWasInterrupted를 사용해서 이런 간섭을 처리합니다.
NotificationCenter.default.addObserver(self,
                                       selector: #selector(sessionWasInterrupted),
                                       name: .AVCaptureSessionWasInterrupted,
                                       object: session)
NotificationCenter.default.addObserver(self,
                                       selector: #selector(sessionInterruptionEnded),
                                       name: .AVCaptureSessionInterruptionEnded,
                                       object: session)
AVCam은 중단 알림을 받으면 중단이 끝날 때 작업을 재개하는 옵션으로 세션을 일시 중지하거나 중단할 수 있습니다.
AVCam는 sessionWasInterrupted를 알림 수신 핸들러로 등록하여 캡처 세션이 중단될 때 사용자에게 알립니다.
if reason == .audioDeviceInUseByAnotherClient || reason == .videoDeviceInUseByAnotherClient {
    showResumeButton = true
} else if reason == .videoDeviceNotAvailableWithMultipleForegroundApps {
    // Fade-in a label to inform the user that the camera is unavailable.
    cameraUnavailableLabel.alpha = 0
    cameraUnavailableLabel.isHidden = false
    UIView.animate(withDuration: 0.25) {
        self.cameraUnavailableLabel.alpha = 1
    }
} else if reason == .videoDeviceNotAvailableDueToSystemPressure {
    print("Session stopped running due to shutdown system pressure level.")
}
카메라 뷰 컨트롤러는 AVCaptureSessionRuntimeError를 관찰하여 오류 발생 시 알림을 받습니다.
NotificationCenter.default.addObserver(self,
                                       selector: #selector(sessionRuntimeError),
                                       name: .AVCaptureSessionRuntimeError,
                                       object: session)
런타임 오류가 발생하면 캡처 세션을 다시 시작합니다.
// If media services were reset, and the last start succeeded, restart the session.
if error.code == .mediaServicesWereReset {
    sessionQueue.async {
        if self.isSessionRunning {
            self.session.startRunning()
            self.isSessionRunning = self.session.isRunning
        } else {
            DispatchQueue.main.async {
                self.resumeButton.isHidden = false
            }
        }
    }
} else {
    resumeButton.isHidden = false
}
장치에 과열이 발생하는 것같은 시스템 부하에도 캡처 세션이 중지될 수 있습니다.
카메라가 스스로 캡처 품질을 떨어뜨리거나 프레임을 떨어뜨리지 않습니다.
카메라가 임계 지점에 도달하면 카메라 작동이 중지되거나 장치가 꺼집니다.
사용자를 당황하게 하지 않으려면 앱이 수동으로 프레임률을 낮추거나 depth를 끄거나 AVCaptureDevice.SystemPressureState의 피드백을 기반으로 성능을 변조하도록 할 수 있습니다.
let pressureLevel = systemPressureState.level
if pressureLevel == .serious || pressureLevel == .critical {
    if self.movieFileOutput == nil || self.movieFileOutput?.isRecording == false {
        do {
            try self.videoDeviceInput.device.lockForConfiguration()
            print("WARNING: Reached elevated system pressure level: \(pressureLevel). Throttling frame rate.")
            self.videoDeviceInput.device.activeVideoMinFrameDuration = CMTime(value: 1, timescale: 20)
            self.videoDeviceInput.device.activeVideoMaxFrameDuration = CMTime(value: 1, timescale: 15)
            self.videoDeviceInput.device.unlockForConfiguration()
        } catch {
            print("Could not lock device for configuration: \(error)")
        }
    }
} else if pressureLevel == .shutdown {
    print("Session stopped running due to shutdown system pressure level.")
}
Capture a Photo
사진 촬영은 세션 큐에서 이루어집니다.
이 프로세스는 비디오 미리 보기 레이어의 비디오 방향과 일치하도록 AVCapturePhotoOutput 연결을 업데이트하는 것으로 시작됩니다.
이를 통해 카메라는 사용자가 화면에서 보는 것을 정확하게 캡처할 수 있습니다.
if let photoOutputConnection = self.photoOutput.connection(with: .video) {
    photoOutputConnection.videoOrientation = videoPreviewLayerOrientation!
}
출력을 조정한 후 AVCam은 포커스, 플래시, 해상도와 같은 캡처 매개 변수를 구성하는 AVCapturePhotoSettings를 생성합니다.
var photoSettings = AVCapturePhotoSettings()

// Capture HEIF photos when supported. Enable auto-flash and high-resolution photos.
if  self.photoOutput.availablePhotoCodecTypes.contains(.hevc) {
    photoSettings = AVCapturePhotoSettings(format: [AVVideoCodecKey: AVVideoCodecType.hevc])
}

if self.videoDeviceInput.device.isFlashAvailable {
    photoSettings.flashMode = .auto
}

photoSettings.isHighResolutionPhotoEnabled = true
if let previewPhotoPixelFormatType = photoSettings.availablePreviewPhotoPixelFormatTypes.first {
    photoSettings.previewPhotoFormat = [kCVPixelBufferPixelFormatTypeKey as String: previewPhotoPixelFormatType]
}
// Live Photo capture is not supported in movie mode.
if self.livePhotoMode == .on && self.photoOutput.isLivePhotoCaptureSupported {
    let livePhotoMovieFileName = NSUUID().uuidString
    let livePhotoMovieFilePath = (NSTemporaryDirectory() as NSString).appendingPathComponent((livePhotoMovieFileName as NSString).appendingPathExtension("mov")!)
    photoSettings.livePhotoMovieFileURL = URL(fileURLWithPath: livePhotoMovieFilePath)
}

photoSettings.isDepthDataDeliveryEnabled = (self.depthDataDeliveryMode == .on
    && self.photoOutput.isDepthDataDeliveryEnabled)

photoSettings.isPortraitEffectsMatteDeliveryEnabled = (self.portraitEffectsMatteDeliveryMode == .on
    && self.photoOutput.isPortraitEffectsMatteDeliveryEnabled)

if photoSettings.isDepthDataDeliveryEnabled {
    if !self.photoOutput.availableSemanticSegmentationMatteTypes.isEmpty {
        photoSettings.enabledSemanticSegmentationMatteTypes = self.selectedSemanticSegmentationMatteTypes
    }
}

photoSettings.photoQualityPrioritization = self.photoQualityPrioritizationMode
샘플은 별도의 개체인 PhotoCaptureProcessor를 사용하여 각 캡처 수명 주기를 격리합니다.
캡처 주기의 명확한 구분은 단일 캡처 주기가 여러 프레임의 캡처를 수반할 수 있는 Live Photo에 필요합니다.
사용자가 중앙 셔터 버튼을 누를 때마다 AVCam은 capturePhoto(with:delegate:)를 호출하여 이전에 구성된 설정으로 사진을 캡처합니다.
self.photoOutput.capturePhoto(with: photoSettings, delegate: photoCaptureProcessor)capturePhoto 메서드에는 두 가지 매개 변수를 받습니다.
* 노출, 플래시, 포커스, 토치 등 사용자가 앱을 통해 구성하는 설정을 캡슐화하는 AVCapturePhotoSettings
* AVCapturePhotoCaptureDelegate프로토콜을 준수하는 delegate로, 사진 캡처 중에 시스템이 제공하는 후속 콜백에 응답합니다.
앱이 capturePhoto(with:delegate:)를 호출하면 사진촬영을 시작하는 과정이 끝납니다.
이 시점부터 개별 사진 캡처 작업은 delegate 콜백에서 수행됩니다.
Track Results Through a Photo Capture Delegate
메소드 캡처포토는 사진 촬영 과정만 시작합니다.
나머지 프로세스는 앱이 구현하는 delegate 메서드로 수행됩니다.

capturePhoto를 호출하면 photoOutput(_:willBeginCaptureFor:)이 먼저 도착합니다.
확인된 설정은 카메라가 다가오는 사진에 적용할 실제 설정을 나타냅니다.
AVCam은 라이브 포토와 관련된 동작에만 이 방법을 사용합니다.
AVCam은 livePhotoMovieDimensions 크기를 확인하여 사진이 Live Photo인지 확인하려고 합니다.
사진이 Live Photo이면 AVCam은 진행 중인 Live Photo를 추적하기 위해 카운트를 증가시킵니다.
self.sessionQueue.async {
    if capturing {
        self.inProgressLivePhotoCapturesCount += 1
    } else {
        self.inProgressLivePhotoCapturesCount -= 1
    }

    let inProgressLivePhotoCapturesCount = self.inProgressLivePhotoCapturesCount
    DispatchQueue.main.async {
        if inProgressLivePhotoCapturesCount > 0 {
            self.capturingLivePhotoLabel.isHidden = false
        } else if inProgressLivePhotoCapturesCount == 0 {
            self.capturingLivePhotoLabel.isHidden = true
        } else {
            print("Error: In progress Live Photo capture count is less than 0.")
        }
    }
}photoOutput(_:willCapturePhotoFor:)은 시스템이 셔터 사운드를 재생한 후 바로 도착합니다.
AVCam은 이 기회를 사용하여 화면을 플래시하여 사용자에게 카메라가 사진을 캡처했음을 알립니다.
샘플 코드는 미리 보기 뷰 레이어의 불투명도를 0에서 1까지 애니메이션화하여 이 플래시를 구현합니다.
// Flash the screen to signal that AVCam took a photo.
DispatchQueue.main.async {
    self.previewView.videoPreviewLayer.opacity = 0
    UIView.animate(withDuration: 0.25) {
        self.previewView.videoPreviewLayer.opacity = 1
    }
}photoOutput(_:didFinishProcessingPhoto:error:)은 시스템의 깊이 데이터 처리가 완료되고 인물 사진일 때 표시됩니다.
AVCam은 이 단계에서 인물 사진 처리 및 깊이 메타데이터를 확인합니다.
// A portrait effects matte gets generated only if AVFoundation detects a face.
if var portraitEffectsMatte = photo.portraitEffectsMatte {
    if let orientation = photo.metadata[ String(kCGImagePropertyOrientation) ] as? UInt32 {
        portraitEffectsMatte = portraitEffectsMatte.applyingExifOrientation(CGImagePropertyOrientation(rawValue: orientation)!)
    }
    let portraitEffectsMattePixelBuffer = portraitEffectsMatte.mattingImage
let portraitEffectsMatteImage = CIImage( cvImageBuffer: portraitEffectsMattePixelBuffer, options: [ .auxiliaryPortraitEffectsMatte: true ] )photoOutput(_:didFinishCaptureFor:error:)은 최종 콜백으로, 단일 사진의 캡처 끝을 표시합니다.
AVCam은 다음 사진 캡처에 남아 있지 않도록 deleagate와 설정을 정리합니다.
self.sessionQueue.async {
    self.inProgressPhotoCaptureDelegates[photoCaptureProcessor.requestedPhotoSettings.uniqueID] = nil
}
이 delegate 메서드에서는 캡처한 사진의 미리보기 썸네일 애니메이션과 같은 다른 시각 효과를 적용할 수 있습니다.
자세한 내용은 Tracking Photo Capture Progress을 참조하십시오.
Capture Live Photos
생략
Capture Depth Data and Portrait Effects Matte
생략
Capture Semantic Segmentation Mattes
생략
Save Photos to the User’s Photo Library
사용자의 사진 라이브러리에 이미지 또는 동영상을 저장하려면 먼저 해당 라이브러리에 대한 액세스를 요청해야 합니다.
쓰기 권한 부여 요청 프로세스는 캡처 디바이스 권한 부여를 미러링합니다.
사용자가 Info.plist에 제공하는 텍스트로 경고를 표시합니다.
AVCam은 AVCaptureOutput이 출력으로 저장할 미디어 데이터를 제공하는 fileOutput(_:didFinishRecordingTo:from:error:)콜백 메서드에서 인증을 확인합니다.
PHPhotoLibrary.requestAuthorization { status in자세한 내용은 Delivering an Enhanced Privacy Experience in Your Photos App을 참조하십시오.
Record Movie Files
AVCam은 .video 한정자를 사용하여 입력 장치를 쿼리하고 추가함으로써 비디오 캡처를 지원합니다.
앱은 후면 듀얼 카메라로 기본 설정되지만 장치에 듀얼 카메라가 없는 경우 광각 카메라로 기본 설정됩니다.
if let dualCameraDevice = AVCaptureDevice.default(.builtInDualCamera, for: .video, position: .back) {
    defaultVideoDevice = dualCameraDevice
} else if let dualWideCameraDevice = AVCaptureDevice.default(.builtInDualWideCamera, for: .video, position: .back) {
    // If a rear dual camera is not available, default to the rear dual wide camera.
    defaultVideoDevice = dualWideCameraDevice
} else if let backCameraDevice = AVCaptureDevice.default(.builtInWideAngleCamera, for: .video, position: .back) {
    // If a rear dual wide camera is not available, default to the rear wide angle camera.
    defaultVideoDevice = backCameraDevice
} else if let frontCameraDevice = AVCaptureDevice.default(.builtInWideAngleCamera, for: .video, position: .front) {
    // If the rear wide angle camera isn't available, default to the front wide angle camera.
    defaultVideoDevice = frontCameraDevice
}
스틸 사진처럼 시스템에 설정을 전달하는 대신 Live Photos에서와 같은 출력 URL을 전달합니다.
delegate 콜백은 동일한 URL을 제공하므로 앱에서 중간 변수에 저장할 필요가 없습니다.
사용자가 Record를 눌러 캡처를 시작하면 AVCam은 startRecording(to:recordingDelegate:)를 호출합니다.
movieFileOutput.startRecording(to: URL(fileURLWithPath: outputFilePath), recordingDelegate: self)capturePhoto가 스틸 캡처를 위해 delegate 콜백을 트리거한 것처럼 startRecording은 동영상 녹화를 위한 일련의 delegate 콜백을 트리거합니다.
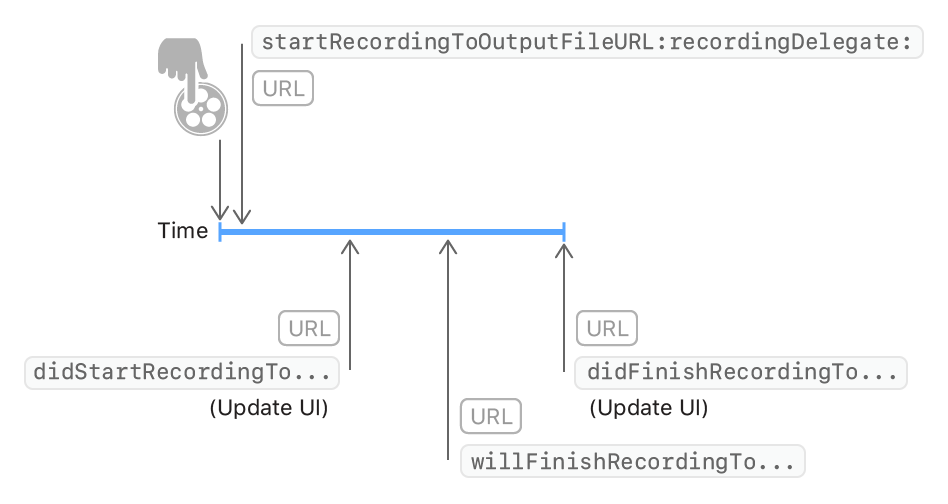
delegate 콜백 체인을 통해 동영상 녹화 진행률을 추적합니다.
AVCapturePhotoCaptureDelegate를 구현하는 대신 AVCaptureFileOutputRecordingDelegate를 구현합니다.
동영상 녹화 delegate 콜백은 캡처 세션과의 상호 작용을 요구하므로 AVCam은 별도의 delegate 개체를 생성하는 대신 CameraViewController를 delegate로 만듭니다.
* 파일 출력이 파일에 데이터를 쓰기 시작하면 fileOutput(_:didStartRecordingTo:from:) 이 발생합니다.
AVCam은 이 기회를 사용하여 녹화 버튼을 중지 버튼으로 변경합니다.
DispatchQueue.main.async {
    self.recordButton.isEnabled = true
    self.recordButton.setImage(#imageLiteral(resourceName: "CaptureStop"), for: [])
}fileOutput(_:didFinishRecordingTo:from:error:)이 마지막으로 발생하여 동영상이 디스크에 완전히 기록되었으며 사용할 준비가 되었음을 나타냅니다.
AVCam은 일시적으로 저장된 동영상을 주어진 URL에서 사용자의 사진 라이브러리 또는 앱의 문서 폴더로 이동할 수 있는 기회를 잡습니다.
              PHPhotoLibrary.shared().performChanges({
                  let options = PHAssetResourceCreationOptions()
                  options.shouldMoveFile = true
                  let creationRequest = PHAssetCreationRequest.forAsset()
                  creationRequest.addResource(with: .video, fileURL: outputFileURL, options: options)

// Specify the location the movie was recoreded
creationRequest.location = self.locationManager.location
              }, completionHandler: { success, error in
                  if !success {
                      print("AVCam couldn't save the movie to your photo library: \(String(describing: error))")
                  }
                  cleanup()
              }
              )
사용자가 수신 전화를 수락하는 경우와 같이 AVCam이 백그라운드로 이동하는 경우 앱은 녹음을 계속하려면 사용자의 권한을 요청해야 합니다.
AVCam은 백그라운드 작업을 통해 이 절약을 수행하기 위해 시스템에 시간을 요청합니다.
이 백그라운드 작업은 AVCam이 백그라운드로 후퇴하더라도 사진 라이브러리에 파일을 쓸 수 있는 충분한 시간을 보장합니다.
백그라운드 실행을 끝내기 위해 AVCam은 기록된 파일을 저장한 후 fileOutput(_:didFinishRecordingTo:from:error:)에서 endBackgroundTask(_:)를 호출합니다.
self.backgroundRecordingID = UIApplication.shared.beginBackgroundTask(expirationHandler: nil)Take Photos While Recording a Movie
생략
'iOS' 카테고리의 다른 글
| [iOS] PinLayout 문서 번역(1) (0) | 2021.11.29 |
|---|---|
| [iOS] Contacts 연락처 사용하기 (0) | 2021.11.25 |
| [iOS] UIImagePickerController 번역 (0) | 2021.10.22 |
| [iOS] Choosing a Capture Device 번역 (0) | 2021.10.22 |
| [iOS] AVCaptureSession 번역 (0) | 2021.10.22 |